Blog

Home » Blog » Comprehensive Guide to Installing a Shower Niche Shelf

Comprehensive Guide to Installing a Shower Niche Shelf

Installing a shower niche shelf transforms your bathroom into a more organized and spa-like space. This DIY project provides built-in storage for toiletries while maintaining a sleek look. Whether you're renovating or upgrading, learning how to install shower niche shelf can save money and add value to your home. Evidence from various home improvement sources leans toward using pre-fabricated niches for beginners, as they simplify waterproofing and reduce errors. However, custom builds offer flexibility for unique designs. Always prioritize safety by wearing protective gear and consulting local building codes.

Understanding Shower Niches and Shelves

A shower niche is a recessed area in the wall, often with integrated shelves for holding items. The shelf installation is crucial for stability and water resistance. Controversy exists around pre-made vs. custom niches: pre-made are quicker but less adaptable, while custom allow for personalized sizes, though they require more skill.

Materials and Tools: A Detailed Breakdown

To install shower niche shelf effectively, prepare these items. Using high-quality materials ensures longevity:

Category

Items

Purpose

Notes

Framing

2x4 lumber, 2.5-inch screws

Create the niche structure

Use pressure-treated wood for moisture-prone areas

Waterproofing

Flexible flashing, polyethylene vapor retarder, waterproof silicone caulk, mesh tape, thinset mortar

Prevent leaks and mold

Overlap flashing by at least 1 inch; apply caulk generously

Backing

Cement backerboard, 1-inch screws

Provide a stable base for tiles

Cut to fit niche sides, top, bottom, and back

Niche & Shelf

Pre-fabricated niche, stainless steel or tile shelves

Main storage component

For custom, build with backerboard; angle shelves 1/16 inch for drainage

Tiling

Tiles, tile adhesive, grout (pre-sealed preferred)

Aesthetic and functional finish

Choose accent tiles for style; match grout color to tiles

Tools

Tape measure, level, miter saw, drill, utility knife, putty knife, trowel, tile saw, construction stapler, caulking gun

Execute precise cuts and installations

A laser level helps with alignment; wet saw for clean tile cuts

Planning and Location Selection

Start with thoughtful planning to install shower niche shelf without regrets. Decide on size: common prefabricated options are 12x12 inches, but custom can be taller (e.g., floor-to-ceiling for a dramatic effect). Location matters—avoid exterior walls to prevent insulation issues, and steer clear of the showerhead wall due to pipes. Position between studs at a reachable height (48-60 inches from floor). Use a story pole (marked straightedge) to map tile layout and avoid slivers. For vertical niches, align with the longest wall outside the splash zone. If on an exterior wall, add extra insulation.

Tips: Measure stud spacing (typically 16 inches). For multi-shelf designs, space them 12-24 inches apart. This step addresses common debates on visibility—place on the least visible wall for privacy.

Step-by-Step Installation Process

Follow this detailed sequence to install shower niche shelf. Break it into phases for manageability.

Phase 1: Framing the Niche

- Measure and mark the opening between studs.

- Cut two 2x4s for horizontal blocking (top and bottom), making the frame 3/4-1 inch larger to accommodate layers.

- Secure with screws, ensuring level. For custom, remove unnecessary braces and install double studs for support.

- If building floor-to-ceiling, cut the bottom plate section.

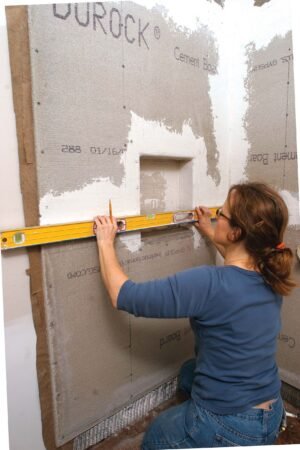
Phase 2: Waterproofing and Backerboard

- Apply flexible flashing, overlapping downward.

- Add vapor retarder, stapling securely and sealing holes with caulk.

- Cut backerboard panels; attach to studs and line the niche interior (back, sides, top, bottom).

- For seams, use mesh tape and thinset; slope the bottom slightly forward.

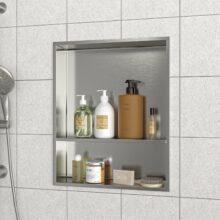
Phase 3: Mounting the Niche and Shelf

- For pre-made: Apply sealant to edges, slide in, and secure. Butter shelves with thinset and embed at desired heights.

- For custom: Build shelves from backerboard or stainless steel, angling downward. Install while tiling for integration.

- Check level; allow drying time.

Phase 4: Tiling the Niche

- Start with the back wall tiles, aligning with surrounding patterns.

- Tile sides, then bottom (sloping for drainage), and top last.

- Use wedges to hold top tiles while mortar sets.

- For accents, incorporate herringbone or penny tiles.

Tile selection can be controversial—some prefer matching the surround for cohesion, others accents for flair.

Phase 5: Grouting and Finishing

- Wait 24 hours, then grout seams, focusing on corners.

- Apply silicone caulk to shelves and edges, matching grout color.

- Clean excess and let cure.

This finalizes the install shower niche shelf, creating a seamless look.

Installing a Shower Niche Shelf

Common Mistakes and Pro Tips

Avoid these pitfalls: Skipping measurements leads to misaligned tiles; inadequate waterproofing causes leaks. Always test for square. Pro tips include using a laser level for precision and pre-sealing grout to reduce maintenance. For eco-conscious users, opt for low-VOC materials. If issues arise, consult professionals—DIY is empowering but complex topics like structural changes may need permits.

This comprehensive approach, informed by established home improvement resources, ensures a successful project. With practice, installing a shower niche shelf becomes second nature, enhancing your bathroom's utility and style.

Get A Free Sample

Try out the products you are interested in and get free samples. See the quality for yourself and let’s start working together right away.

全局弹窗

Get In Touch Today

After you fill out the form, We will contact you within 24 hours.

The first objective will be to understand your needs, then develop a business plan together and provide you with the best pricing!

Address

Workshop No. 3 (Self - designated), Sizhong Industrial Zone, Dazhen Community, Dali Town, Nanhai District, Foshan City

Tel

+86 13392243769

WhatsApp

+86 13392243769

Email

senmry@vip.163.com